Batteries and Charging
Batteries
Your Amiga use two batteries, typically inside forks A and B, but it can be changed. Verify on your Amiga where the battery mount plates are. The specifications for each battery are:
| Parameters | Values |
|---|---|
| Rated capacity | 15 AH |
| Nominal Voltage | 44 V |
| Maximum Charger Voltage | 50.4 V |
| Over-charge voltage protection | 51 V |
| Over-discharge voltage protection | 33.6 V |
| Maximum continuous charge current | 5 A |
| Standard continuous charge current | 2 A |
| Maximum discharge current | 30 A |
| Weight | 5.2 Kg (11.5 Lb) |
| Dimensions | 360 x 150 x 68 mm |
| Operation temperature (charging) | 0 ~ 45 C (32 ~ 113 F) |
| Operation temperature (discharging) | -20 ~ 60 C (-4 ~ 140 F) |
Note that operating your batteries consistently close to any maximums and minimum thresholds can reduce the lifespan of your batteries and ultimately damage the batteries.
Operation
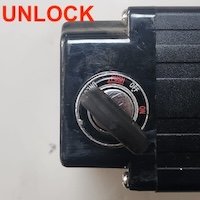
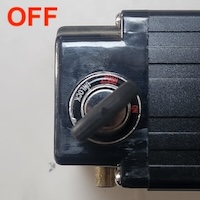
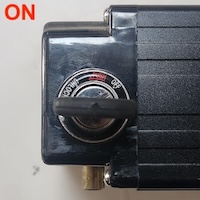
Each battery contain a key switch on its side. The switch serves dual purpose, locking the battery on its respective fork and enabling power for the robot. When batteries are connected together in your Amiga, they either need to have ALL keys in the "ON" position or ALL keys in the "OFF” position. When in doubt, follow the standard procedures:
Powering the Amiga ON
- Slide the battery in using the mounting platform and the grooves located under the battery.
- Insert the key and turn it to the OFF position.
- Connect the IEC C14 power connector on the back of the battery.
- Repeat the first three steps for the other battery
- Turn both batteries ON, powering the Amiga.
Powering the Amiga OFF
- Turn both batteries’ keys to OFF position, all systems will power off.
- Disconnect the IEC C14 power connector from the back of the battery.
- Turn the key switch to the UNLOCK position and remove the keys.
- Pull the battery of the robot using the handle and carefully place it on the ground.
- Repeat the last three steps to DL remove the other batteries.
- Move the batteries to a safe location, away from flammable materials and other structures.
- Charge each battery with your Farm-ng provided 2A charger.
When connecting batteries in parallel, as in our standard Amiga setup, it is required that both batteries have their voltages matched to avoid one discharging itself into the other one at a higher current rate than it is rated for. The most effective way to achieve this is by ensuring both batteries are fully charged before connecting them to your Amiga and keeping them both ON during all operational time.
Operating your Amiga with Batteries at different charge levels/voltages lead to high currents moving from one battery to the other, which can cause permanent damage to the internal cells. With repeated charge/discharge cycles in these conditions, these damages can build up and increase the risk of a battery failure.
Battery failures are potentially dangerous events that can cause fires that spread fast through other components of your Amiga and nearby structure. To minimize this risk, DO NOT charge or discharge (operate) batteries with different charge levels/voltages connected together.
Connecting more than 2 batteries at any time increases the likelihood of voltage mismatch. Do not connect more than two batteries together at any time in your Amiga.
If you are not certain, or cannot enforce the correct usage of your batteries, we recommend using only one battery at a time.
Fuses
To protect all circuits in your Amiga, all batteries are equipped with a fuse located on its side close to the power output connector. The fuse must be 30 Amp, slow blow, and we recommend using ceramic fuses. Remove it using a phillips screwdriver.
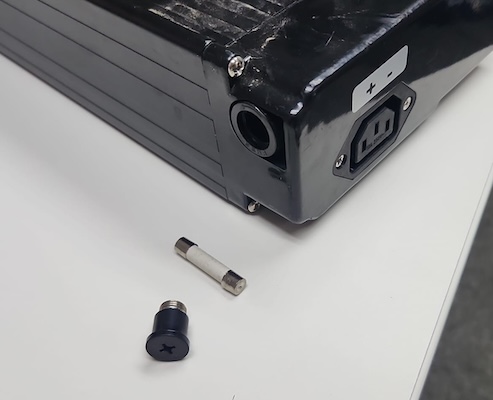
When you battery is not supplying any voltage to the robot, it is likely due to a blown fuse. Verify its integrity using a multimeter before you proceed with your troubleshooting process.
Charging you Amiga
Each Amiga typically comes with 2 batteries and 2 chargers.
To charge your batteries, remove them from the robot, lift the handle and connect the charger. You will notice the LED in your charging brick will turn RED while the battery is charging and GREEN when done.

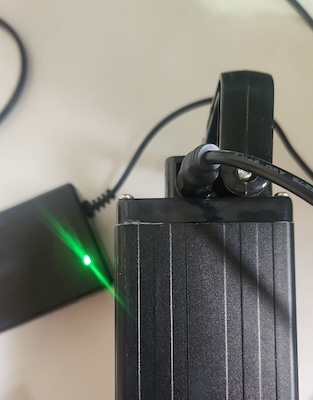
Your standard charger can output power at 2 A (max), which will charge a battery for an Amiga in about 5 hours.
Only use Farm-ng provided chargers. The use of different chargers can damage the internal components of your batteries, which can lead to dangerous failures.
Battery charging involves high electric currents and, as any equipment operating at this capacity, has an electrical risk associated with. When charging your batteries make sure the chargers, cables, and batteries are in good condition. For additional safety, charge in an open area, away from flammable materials, structures, and ideally on a concrete floor. This setup minimizes the risk of fire spreading in the unlikely event of an incident.
If you have any questions or concerns about battery proper charging and handling, please contact our support team at support@farm-ng.com.